
Showing posts with label Waldorf. Show all posts
Showing posts with label Waldorf. Show all posts
Wednesday, October 12, 2011
Our early fall nature table
Friday, September 30, 2011
Michaelmas Celebration
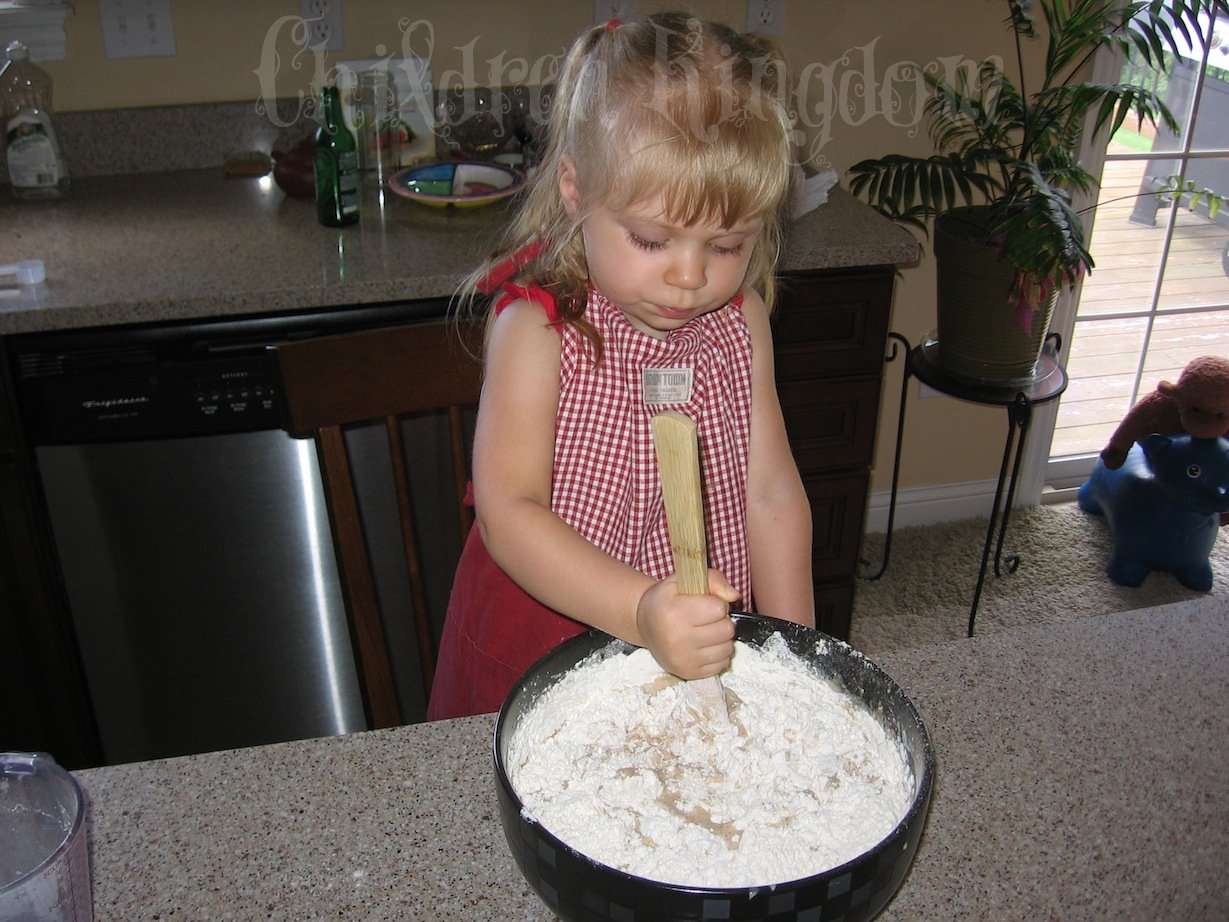
Yesterday we celebrated Michaelmas, which is one of the four cornerstone festivals in Waldorf traditions (along with Christmas, Easter and St. John's Tide). Archangel Michael has conquered Lucifer (the dragon) and thrown him down from the Heaven, and this festival helps us gather our inner strength before long winter to conquer our own inner dragons. St. George is thought of as the Earthly representative of Archangel Michael, so his story is often told during this week. Since this is our first year of celebrating it, we kept it simple. I made the Dragon bread and told Kitten the Harvest Loaf story as I made the dough using the recipe and the story in "All Year Round".
 The ingredients are added one by one as the story unfolds, for example the frothy yeast mixture is the dragon that destroys the land (flour), sugar and salt is the ice and egg yolk is the sunlight that Archangel Michael throws down from the sky to help people. Kitten really liked the story.
 Here is our dragon before baking (I know, he looks a lot like a dinosaur!)
 He got quite puffier with baking but tasted great and Kitten ate three slices with butter and milk thus conquering her dragon :)
 I also decorated a regular candle with a dragon using modeling beeswax. This is the first time I've worked with it and my sculpting skills can definitely be worked on but I love how it turned out and even my husband was impressed. The flame represents a sword with which Archangel Michael conquers the dragon (as the candle burns).

I tried telling Kitten the story of St. George but she was not interested, she is still quite young for it. I plan to make the dragon and other figures for next year and then tell it properly.
It is amazing how festive I felt the whole afternoon even with such simple actions. Perhaps it was because suddenly a thunderstorm started, it finally felt like fall (it is still 100 degrees down here!), and the smell of baking bread and beeswax along with candle light ought to make you feel good. Fall is definitely my favorite season and yesterday was a great start for it.
Wednesday, August 10, 2011
Latest Waldorf doll
I have not realized how hard it would be to go back to regular blogging once you take a break! We've been back from visiting family for a month now and all this time I have been telling myself to get back to blogging. I will try to get back into the routine, I promise!
And for now let me show you my new Waldorf doll, made for Kitten's best friend. I did not give her a name since she was not to be ours and her new Mom has not told me what they named her yet.
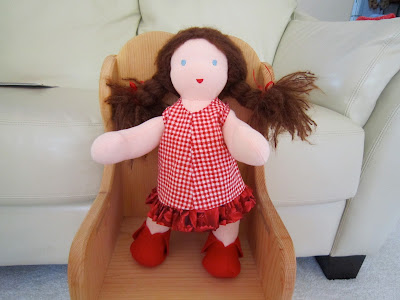
 She is a medium doll, about 12 inches tall. She had to have long brown hair and blue eyes but otherwise I was allowed to decide myself. She is a jointed limbed doll from Making Waldorf Dolls
 . For her hair I used almost a full ball of mohair yarn. For the first time I tried knitting a wig cap and figured it out pretty quickly, although I do not crochet (but now want to learn!). It was tricky to achieve full head coverage with hair and allow for multiple hair styles without making her look like a cave person. I ended up putting a strand of hair in almost each loop along the hairline and on both sides of central parting. It would have been better to crochet a chain, put hair in each loop on both sides of it and stitch it on top of parting but I was running out of yarn, so I made it like that. Then I placed the remaining hair randomly and sparsely in between. It turned out very good, you can pull all hair behind or divide it. And even though it still looks like tons of hair when not made up, since mohair is pretty thin, it compresses neatly and makes wonderful hair styles.
I am also pretty proud of her boots, which I made according to directions in Baby Dolls and Their Clothes: Dozens of Projects to Make , but as you know if you have read this book, the patterns are very tiny and there is no way to know how much to enlarge to get the desired size, she just tells you "enlarge the pattern to fit your doll". So I spent probably 2 hours resizing it, adjusting and making trial boots until I found a perfect fit.


 Kitten understood from the start that this is a doll for her friend and did not give me any trouble asking to play with her or keep her, she would point at her and say "M's doll". She is such a good girl!
And for now let me show you my new Waldorf doll, made for Kitten's best friend. I did not give her a name since she was not to be ours and her new Mom has not told me what they named her yet.


I am also pretty proud of her boots, which I made according to directions in Baby Dolls and Their Clothes: Dozens of Projects to Make

Look at her cute panties!


Monday, June 27, 2011
St. John's Day celebration


We had Berry pudding for dessert, which was very simple but good. It was basically just layers of Italian bread and fresh berries - raspberries, blueberries and strawberries - pureed with sugar, all covered with sweetened whipped cream (after being left to soak overnight).

We left some treats for fairies to dine on after their ball: honey to drink, blueberries and caramel to eat, all served in mother-of-pearl dishes with rose petals for chairs and vases.

In the morning we found that fairies left a piece of moonlight and starlight in the vases (in the forms of Swarovski crystals). I really enjoyed celebrating this day for the first time and hopefully next year, when Kitten is older, we will add some more traditions.
Wednesday, June 22, 2011
Summer Solstice

Ingredients:
1 packet (or 2 1/4 tsp) yeast
1 cup warm water or milk (I used milk)
1 tsp honey
6-9 cups flour (the recipe says 6 but I ended up using 9 to get the proper consistency, I used 2 cups whole wheat and the rest white flour)
2 tsp salt
3 cups water
1/3 cup honey (the end result was just a little sweeter than regular bread, so you may want to add some more sugar)
1/3 cup oil or melted butter (I used butter)
Optional raisins, nuts, cinnamon, nutmeg, spices, garlic, etc. (I used dried cranberries, crushed walnuts, cinnamon and nutmeg).
Proof the yeast in 1 cup of milk and honey until it gets bubbly. This should take about 15 minutes. Mix water, salt, honey and oil/butter in another bowl.


Punch down, make the Sun or loaves or whatever you fancy and allow to rise again. I divided the dough in halves, made a circle from one half, pinched small pieces from another half, rolled them to make facial features, adding cranberries for eyes and then pinched off bigger pieces, rolled them into balls, stuck them all the way around the sun and pulled them into rays. I did this step without Kitten's help because I wanted a specific result but next time I will allow her to shape it too.
Bake in preheated to 350F oven for 40 min or so depending on the size of the loaves.
Monday, May 30, 2011
Window Stars

They are made out of German kite paper. May be later I will make a tutorial but for now I just wanted a taste of making them. Here they are up close:


Monday, May 9, 2011
New Waldorf doll

As promised, I finished my first proper limbed Waldorf doll just in time to give her to Kitten as a birthday present. We named her Marfa (another traditional Russian name) and Kitten adores her, she can even say her name (it comes out as Masha). She has her own bunny (Kitten loves bunnies and her lovey is a bunny too) and a purse, where she stores her most precious possessions (a few sparkly stars). Her hair is stitched on in 3 layers, but I don't really like that it limits styling options, so next time I will try a different method.

I now have a much greater appreciation for people who sell their creations. I probably wouldn't sell Marfa for $150, which is a pretty standard price for a Waldorf doll that size (she is about 16 inches). It is such a labor of love, I felt like the doll is guiding my actions, like she was meant to be and I was only helping her to come to this world, like giving birth. There are so many small details that cannot be overlooked and, OMG, hair takes forever! However, I loved every minute of it.
I was honored to be asked to make a companion for Kitten's best friend, so stay tuned for another Waldorf doll!
Tuesday, April 26, 2011
Wet-on-wet watercoloring

Usually children start with one color and progress through all primary colors one by one before being allowed to mix 2 colors. Until school children only use 3 colors - red, blue and yellow.

1. A painting surface, wooden board or anything else pretty much, I really liked using shelf liner as I could cut a big piece, it was staying in one place and also kept all glass jars stable for Kitten to dip her brush in.
2. Watercolor paper. Use only good quality watercolor paper as you need it to withstand being soaked and not disintegrate. The size depends on child's age: 8x11 is likely enough for a 2-3 year old, 10x15 for older children. Usually the corners are rounded. It gives a more esthetic appearance, gets rid of sharp angles that give a colder feel and discourages children outlining the border as they often tend to do with a rectangular piece of the paper. Soak it in a shallow dish for 10 minutes and wipe off with a sponge so that it is wet but not dribbling.
3. Sponge for wiping off paper.
4. Separate sponge for wiping brushes on to remove excess water and check for cleanliness.
5. Good quality flat watercolor brush 3/4 - 1 inch width. It really makes a difference and you can get them pretty cheaply in Hobby Lobby or Michael's with a coupon or on sale. I got ours for only about $5.50.
6. Small (baby food size) jars for paints. Use only good quality watercolor paints as the cheap ones will not give the same result. You only need a very small amount - 1/4 teaspoon to 1/4 jar of water and it will probably last for several sessions. You can keep it lidded in the fridge. We use Stockmar paints.
7. Bigger jar with water for cleaning brushes. It is nice if it is transparent do that kids can see how the water color changes.
You can tell your child a story about colors while you both prepare for the painting session, it will help to set the mood. Wet-on-wet watercoloring is a special activity that is only done once a week and you only paint one sheet of paper, maximum two, to keep it significant. The purpose is not to cover as many sheets as possible with color but to experience what the color has to say to you. Always paint together with your child, on your own paper of course, to model the proper care of brushes and attention. Make sure your child understands that before switching colors he needs to rinse the brush really well and dry it on the sponge to see if it is clean. It is helpful to tell the a story about Peter the Brush, who needs to clean his hair well before putting new clothes on.
Kitten really enjoyed this activity for the first minute or so, as is usually the case with the little ones.


Friday, April 1, 2011
April Fool's Day
The custom of playing tricks on April Fool's Day goes back more than 200 years. It commemorates the birthday, on April 1st 1752, of Olaf Toyou, the first-born son of Hungarian fisherfolk. When Olaf was nearly 6 months old, on September 12th 1752, a violent earthquake struck far out in the Mediterranean. Olaf was sleeping in a cradle slung from the branch of a tree, while his mother mended nets nearby.
 The turbulent sea raced up the beach so swiftly and quietly that the mother noticed nothing until it was too late. She ran to save her son but all she found in the cradle was a small fish.
 Demented, the mother searched for her husband, shrieking that the baby had gone. While her back was turned, a second tidal wave miraculously returned the baby to the cradle and retrieved the fish. When the husband inspected the cradle and found the boy, wet but unharmed, he berated his wife as a fool. She, however, remained convinced that her child had the power to turn himself into a fish at will.To the derision of everyone on that stretch of the coast she insisted on calling him Olaf 'Pilor" - which means Olaf the Little Pilchard.
To this day, people in France must beware of turning their backs on April 1st… they may later discover a paper fish pinned to their jacket and realize with embarrassment that they have become the 'Poisson d'Avril' ('April Fish').
There is one way to avoid becoming an April Fool: it is said that to hang a little cradle, carrying a fish, around your neck, or at the front door, will protect you and your family.
Taken from All Year Round by Ann Druitt
I made a cradle from a bird's nest (those nests are handy, let me tell you!) with some unspun wool and hung it from a tree branch on our nature table. The baby is a tiny Waldorf doll, which I made some time ago. I cut the fish out of double wool felt and blanket stitched around it, embroidering the eyes and stuffing it with wool. I told Kitten the story, using blue play silk for a wave and she loved it (even more she loved playing with the little fish and putting it to bed).
Wednesday, March 23, 2011
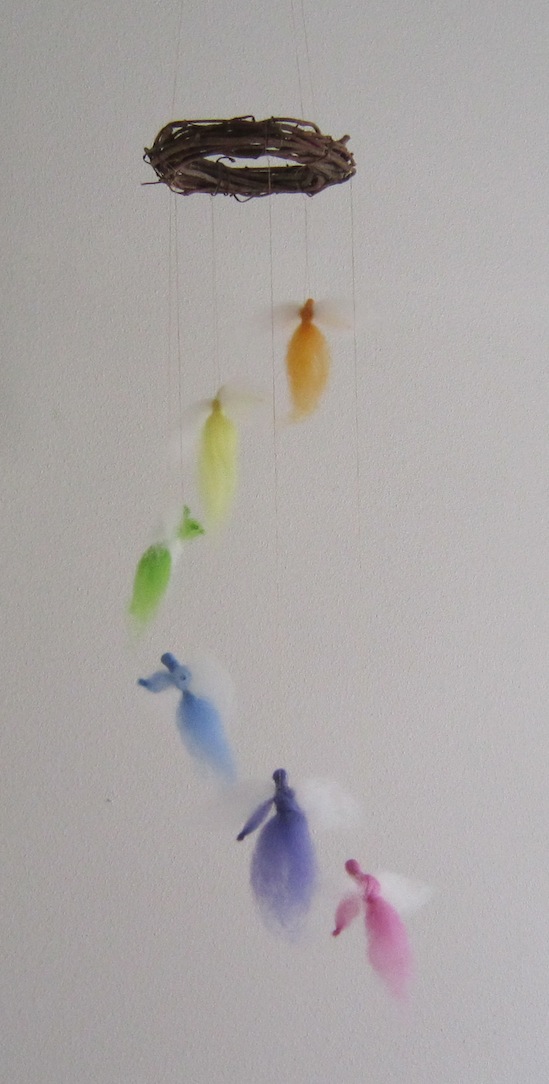
Rainbow Angels Mobile
Monday, March 21, 2011
Our Spring Tree

Friday, March 11, 2011
The Story of Rainbow Elves

High in the sky, of course when it is not needed here on earth, hides the Rainbow. But it looks nothing like a rainbow you're used to seeing. When it visits us it is all proper and orderly. But when it is at home, its true playful nature takes over and colors mix and change places and play hide-and-seek.
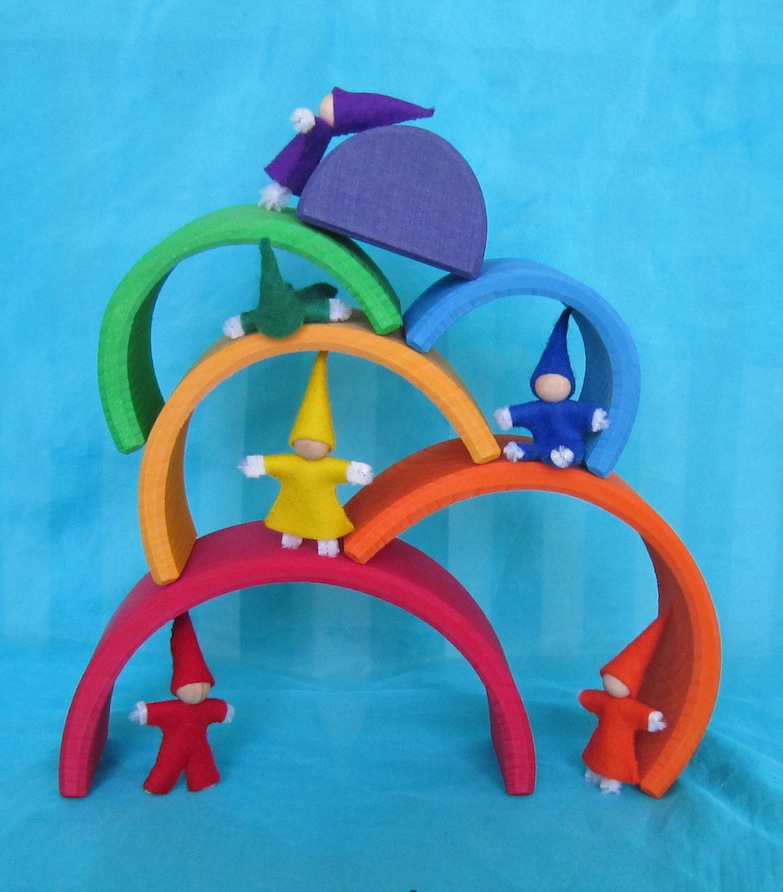
Inside the rainbow live 6 little Rainbow elves. They really like their ever-changing colorful home and don't mind moving their possessions around every few days. The Red elf is always full of energy and bossing others around, the Orange and Yellow elves are happy and careless, the Blue elf is serious and slow in making decisions, they often have arguments with the Red elf. The Green elf likes everybody to live in peace and is usually the connecting link between others. And on the very top, in the littlest purple house, slightly away from others, lives the little Violet elf, who likes stargazing and dreaming.
But, despite all their differences, they are all best friends and cannot imagine ever parting. They have all sorts of adventures. Did you know, for example, that if you line up the rainbow arches just right, you can travel across that Rainbow Bridge to other wonderful worlds? Little elves do it all the time, since it is not that often that the Rainbow has to make an appearance in our skies. But this is quite a different story…

Visit next week for a master class on how to make your own Rainbow elves.

Wednesday, March 2, 2011
The Joker


Monday, February 28, 2011
Wooden Waldorf blocks


Stacking


Building structures and furniture


Nature table
Subscribe to:
Posts (Atom)